 What are they and how do you apply them?
Nano-tip hair extensions are becoming one of the most sought-after hair extension methods that every hair extension specialist should know about.
Smaller than micro rings and virtually undetectable, nano-tips are perfect for clients with thin or fine hair types. And, as they don’t require glue, heat, or chemicals to apply, nano-tips are lauded as one of the least damaging options on the market.
Alice Dawkins of leading hair extension supplier Milk + Blush shares a step-by-step guide to help hair professionals apply nano-tip hair extensions with the perfect blend…
Prep the hair
Before you can begin to apply nano extensions, you need to make sure your client’s hair is in the correct condition.
Greasy hair can cause nanorings to slip, so remove any oiliness with a clarifying shampoo before fitting nano-tip extensions.
Hair stylists should also perform a skin patch test to ensure no adverse reactions to the nano-tip bonds or nano rings.
Pick the right nano ring shade
While shade matching the hair extensions to the client’s hair will be a stylist’s primary concern for a seamless blend, you shouldn’t neglect to consider the colour of your chosen nanorings.
Nano-tip hair extensions are virtually undetectable due to their small size. However, a colour mismatch between the ring and the client’s natural hair colour can quickly break the illusion.
For the most discreet application, stylists should take the time to colour-match the nano ring to the client’s natural hair colour. If in doubt, always opt for a darker shade than one too light.
Section the hair
How you section your clients’ hair will depend entirely on their needs and the desired outcome of the extensions.
For clients simply wanting filler pieces for added thickness, focus solely on the front of the hair, using clips to section it from the crown to behind the ear. Be sure to leave enough of a gap around the hairline to conceal the nanorings.
Around the front of the hair, work from back to front in diagonal rows to give the illusion of more volume and avoid the rings tugging on the hair should clients wish to wear their hair up.
For those after a full head of extensions, ensure your client is sitting comfortably, as it can take up to four hours. You’ll need to section the whole head for a clean installation. Start at the back of the head above the nape, working in neat horizontal rows.
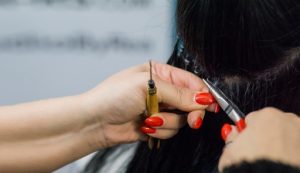 Apply the nanorings
Once the hair is sectioned, begin applying each weft individually from the bottom layer to the top layer, using the stick end of your comb to rest the bead on.
Take a small section of hair (under 1cm wide) and feed it through the nano ring using a loop threading tool, pushing the bead up onto the hair. The section should be small enough to easily fit through the nano ring without any bunching.
Keep your silicone tips straight and central through the nano ring to help the hair extension follow the flow of your client’s natural hair and prevent any awkward kinks while the hair grows out.
Be wary of taking sections too thin that may not be able to handle the weight of the nano ring and extension. Too much strain on thin hair at the root could lead to damage and thinning.
Next, insert the silicone tip into the ring on the underside of the natural hair to help cover up the extension and create a seamless blend. Avoid putting it too close to the root area to prevent pulling.
Then, clamp it in place using pliers so that the ring has flattened. The ring should sit around a centimetre down from the root to ensure the bond has full rotation while still being discreet.
Be sure there are no crosshairs that could pull on delicate hair strands. If an excess tip is sticking out from the ring, you can trim this to make the extensions as comfortable as possible for your client.
Add finishing touches
No hair extension application is complete without taking the time to blend the natural hair.
Curling the hair is every stylist’s tried and true method of blending hair extensions. Princess curls, in particular, make for a seamless transition and provide dreamy content for your social media.
However, taking time to perfect your blend so clients can wear their hair straight will provide versatility and ensure it is as seamless as possible.
Feathering the client’s hair is the key to preventing any harsh, telltale lines where their natural hair ends and the extensions begin. Adding layers around the face also helps blur extensions and gives the most natural appearance.